How to Remove Write Protection From USB Pendrive (5 Ways)

In this era of technology, we all come through gadgets that we could not even imagine few years back. One of them is Pendrive, a very tiny gadget manufactured to store huge amounts of data. Invention of Pendrive revolutionized the way we transferred data. Now we do not need to carry all those fragile CD’s and DVDs with us. Just plug-in Pendrive and you got everything you need. As we can easily make bootable usb for OS installation. But pendrive manufacturers keep on improvising their products and thus they introduces write protection in Pendrives. Write protection is a setting that blocks any sort of modification or deletion of a file. Even their are other possible ways to protect usb with password. But this is an ideal feature to secure data on USB but sometime it malfunctions and we can able to remove write protection from usb pendrive. Then you can not delete or copy a file or format the USB even when write Protection is switched off.
How To Remove Write Protection From USB Pendrive/SD Card. ?
Method 1:- Remove Write Protection From Pendrive Using Regedit.
Registry Editor is a collection of resource for Windows OS. We can easily edit, update and remove settings for any particular file, device and windows system. So we can also use registry editor to remove write protection from usb drive. So to remove the write protection follow below given steps.
- First of all open your “Start menu“, and search for “Run” option.
- Then type in “regedit” into run box and press Enter.
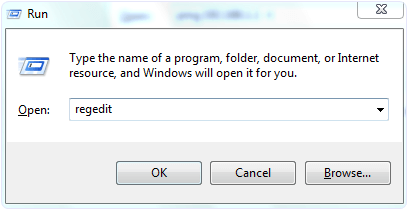
- After that new window for registry editor will get open.
- Next step is to navigate through following path:-
HKEY_LOCAL_MACHINE > SYSTEM> CurrentControlSet > Control >S torageDevicePolicies
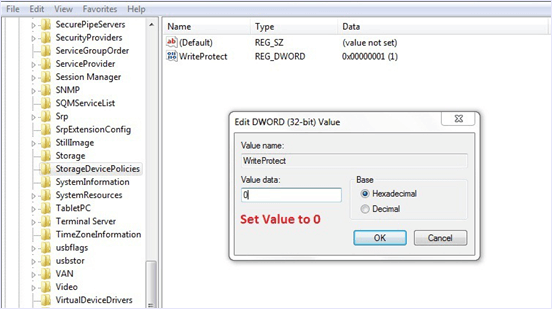
- After successfully reaching to that portion as shown above. Double-click the “WriteProtect” key located in the right side pane and set the value to 0.
- Go to the Data Value box and press “OK”
To finish the process safely remove the Pendrive, Restart your computer and Plug-in pendrive again. Hope this solution will works for you.
Method 2:- Remove Write Protection From USB Drive Using Command Prompt.
In case you are not able to fix write protection error from pendrive by using above registry editor method. Then we suggest you to try command prompt for this purpose. CMD is basically used for various purpose as we already listed my command prompt tricks. So we hope by cleaning you USB drive or memory card with cmd will fix write protection error.
- Firstly Click On “Start Button” >> Then Search “CMD” >> Then Click Enter to open command prompt window.
- Then type “diskpart” and press enter and another window will appear.
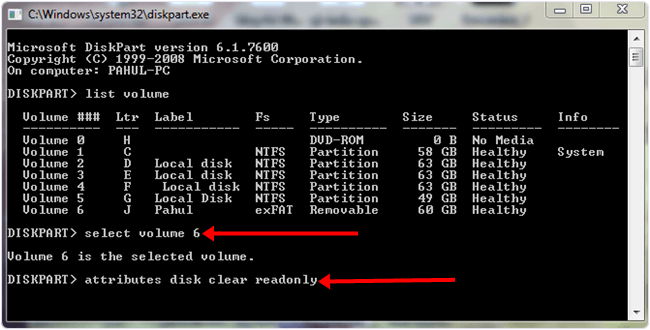
- Type “list volume” and press Enter. This command will display a list of drives connected to tour computer.
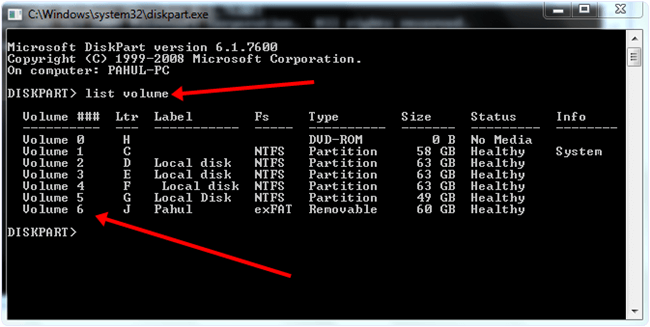
- Search for your pendrive by the letter that follows it name.
- Type select volume x. Replace x with the number from the first column in the list for the USB drive or SD card you want to perform commands for.
- For example, if the USB drive is Volume 3, you’d type select volume 3.
- Type “attributes disk clear readonly” and press enter.
- Type “exit“ and press enter.
Now you should remove the drive and re-insert it and hope this method will fixed issue.
Method 3:- Remove Write Protection From Pendrive By Formatting
If none of the methods above have worked, try formatting your pendrive in safe mode.
- Restart your computer and press the “F8” key. Select Safe Mode with networking from the list that follows.
- Open the “My Computer” window by pressing “Win + E” buttons.
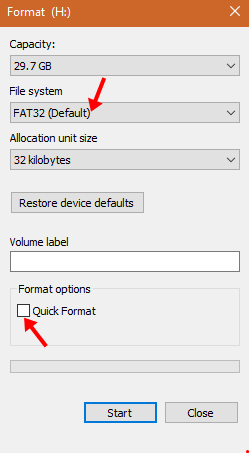
- Right click on your drive and click on “Format”.
- Select “FAT32” from the “File system” menu.
- Uncheck “Quick Format” option.
- Click on “Start” button. Windows will Start to Format the drive.
Also Check:- How To Format Pendrive With Different Ways
How To Remove Write Protection From USB Pendrive On Mac. ?
Method 1:- Repairing Permissions.
It is possible that your drive’s permissions may have become corrupted. You can fix these using Disk Utility. Follow the steps below to Remove Write Protection from Pendrive on mac OS.
- Find “Disk Utility” in the Utilities folder.
- The Disk Utility window should list your hard drive, CD drive, and any attached other devices. Select the device from which you wish to Remove Write Protection.
- Click on “First Aid’ Button. Now OS will start to scan your drive.
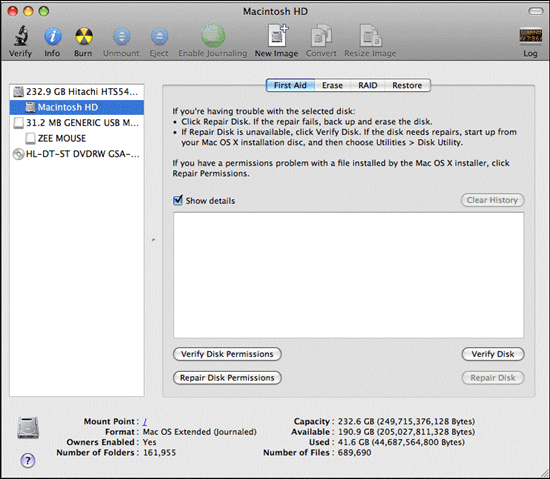
Note:- If you’re using older versions of OS X, click the “First Aid” tab and then click the “Repair Permissions” button.
We hope this repair permission method should help you to remove Write Protection from Pendrive.
Method 2:- Formatting Drive To Remove Write Protection From Pendrive On Mac.
If the above given don’t helps to fix write protection issue. Then only possible left solution is by formatting drive. So to format drive on mac OS follow the steps.
- Open the “Disk Utility” app from your Utilities folder. Your USB drive will be listed in the left sidebar and select it.
- Then Click on “Erase tab” for formatting.
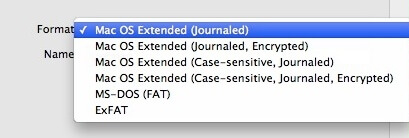
- Select “MS-DOS FAT” option before formatting the Drive.
- Click on “Erase” button. It will start formatting the Drive.
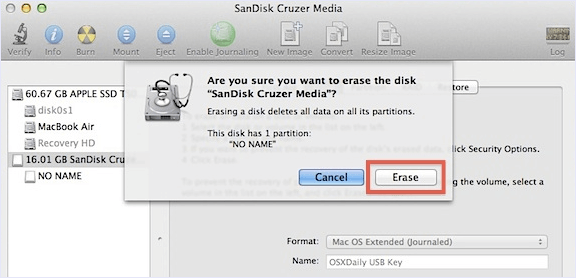
- After formatting is done you can try re-using your drive by re-inserting it.
We hope all these methods will be help to remove write protection from USB drive. If all these methods failed to repair your drive than your USB is mechanically damaged and it’s time to buy a new USB.
YouTube Tutorial On Removing Write Protection
In case you face any problem, don’t forget to comment below and if it works please also share it with others.



No comments
Post a Comment